2024. 4. 29. 10:24ㆍLinux/KALI
Snort 라는 오픈소스 침입탐지 프로그램에 대해서 알아보자
Snort - Network Intrusion Detection & Prevention System
With over 5 million downloads and over 600,000 registered users, it is the most widely deployed intrusion prevention system in the world.
www.snort.org
위 홈페이지에서 다운로드 가능하며
최신 버전으로 wget을 이용해 다운로드 후 설치해주자
yum install -y epel-release
wget https://www.snort.org/downloads/snort/snort-2.9.20-1.centos.x86_64.rpm --no-check-certificate
wget https://www.snort.org/downloads/snort/snort-openappid-2.9.20-1.centos.x86_64.rpm --no-check-certificate

yum install -y snort-2.9.20-1.centos.x86_64.rpm
yum -y install snort-openappid-2.9.20-1.centos.x86_64.rpm --skip-broken
그 다음 Snort 환경 설정 파일을 백업해두자
cp /etc/snort/snort.conf /etc/snort/snort.bak
그 다음은 libdnet 이라는 관련 패키지를 설치하고
심볼릭 링크로 아래 표시된 두 파일을 링크해주자
마지막으로 디렉토리도 생성해주자
yum -y install libdnet
cd /lib64
ln -s libdnet.so.1.0.1 libdnet.1

mkdir -p /usr/local/lib/snort_dynamicrules
그리고 환경 설정 파일을 수정하자
vi /etc/snort/snort.conf

해당 설정 파일을 아래와 같이 수정해주자
>vi /etc/snort/snort.conf

	45 ipvar HOME_NET 192.168.10.0/24 (현재 네트워크 대역)

	104 var RULE_PATH /etc/snort/rules
	105 var SO_RULE_PATH /etc/snort/so_rules
	106 var PREPROC_RULE_PATH /etc/snort/preproc_rules

	113 var WHITE_LIST_PATH /etc/snort/rules
	114 var BLACK_LIST_PATH /etc/snort/rules

	경로는 모두 절대 경로로 변경

548~651 라인 모두 주석처리
vi 명령어
:548,651s/^/#
다음으로 /etc/snort/rules 디렉토리에
white_list.rules , black_list.rules 파일 생성 해주자
touch /etc/snort/rules/white_list.rules
touch /etc/snort/rules/black_list.rules
이곳에서 정책을 적용 시키는 것이다.
그리고 우리가 사용할 local.rules 파일도 생성해주자

> vi /etc/snort/rules/local.rules

#Ping Detection
alert icmp any any -> $HOME_NET any (msg:"ICMP Echo Request";itype:8;sid:1000001;rev:1;)
alert icmp $HOME_NET any -> any any (msg:"ICMP Echo Reply";itype:0;sid:1000002;rev:1;)

#NMAP(SYN scan)
alert tcp any any -> $HOME_NET any (msg:"NMAP SYN scan";flags:S;sid:1000003;rev:1;)
해당 명령어는 icmp 및 nmap SYN 스캔을 탐지 명령어를 임시로 작성해봤다.

# snort -i ens33 -A console -c /etc/snort/snort.conf그리고 snort를 실행 시켜 보았다.


그 다음 kali에서 ping을 해당 PC로 전송하자
snort에서 ICMP reply,request의 로그가 기록되는 것을 볼 수 있다!
ping 옵션으로 다르게 통신할 수도 있다!
ping -D 1초마다 한번씩 ping 전송
ping -f 플러딩 공격

Nmap -sS 명령어도 마찬가지로 스캔 되는 것을 볼 수 있다!
Nmap의 SYN, FIN, X-MAS, ACK 스캔 모두 확인할 수 있다.

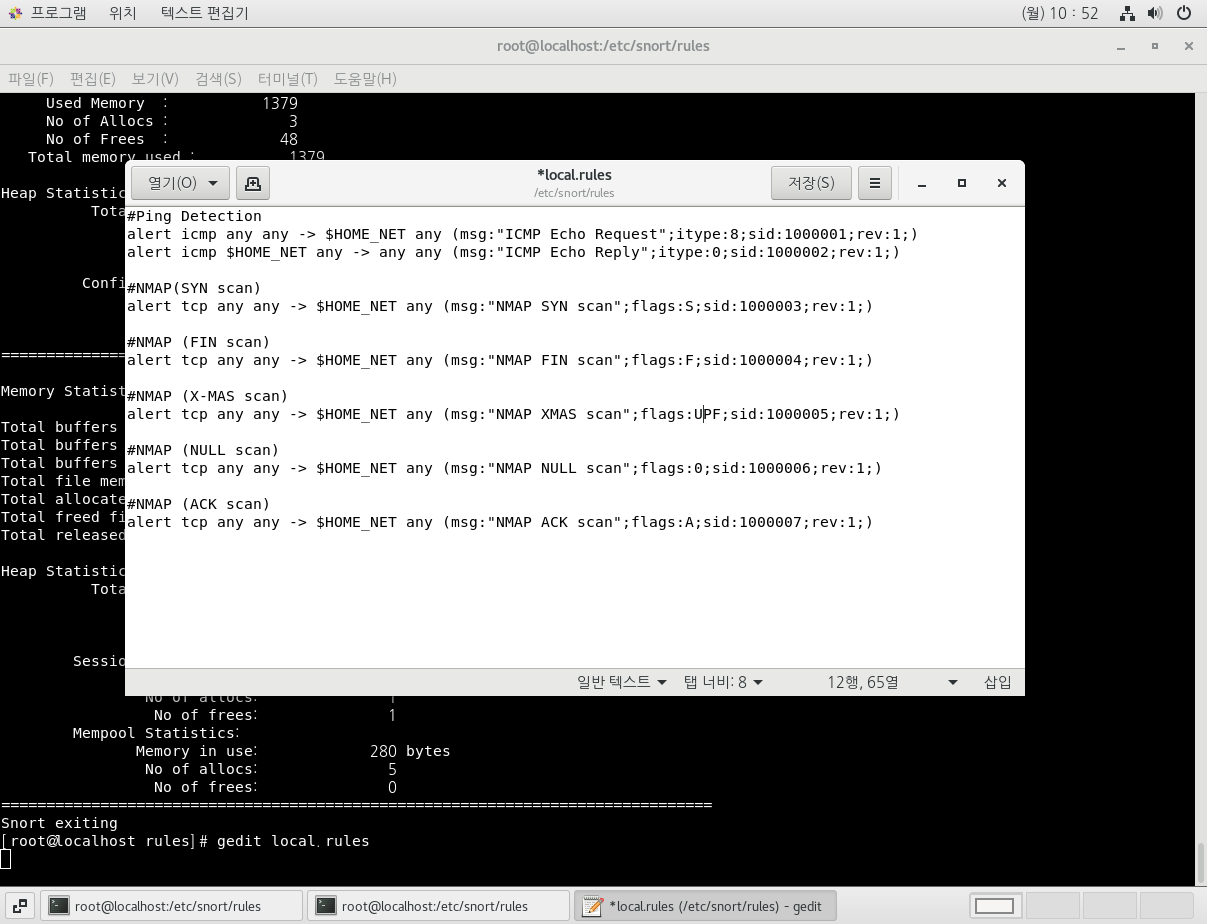
#Ping Detection
alert icmp any any -> $HOME_NET any (msg:"ICMP Echo Request";itype:8;sid:1000001;rev:1;)
alert icmp $HOME_NET any -> any any (msg:"ICMP Echo Reply";itype:0;sid:1000002;rev:1;)

#NMAP(SYN scan)
alert tcp any any -> $HOME_NET any (msg:"NMAP SYN scan";flags:S;sid:1000003;rev:1;)

#NMAP (FIN scan)
alert tcp any any -> $HOME_NET any (msg:"NMAP FIN scan";flags:F;sid:1000004;rev:1;)

#NMAP (X-MAS scan)
alert tcp any any -> $HOME_NET any (msg:"NMAP XMAS scan";flags:UPF;sid:1000005;rev:1;)

#NMAP (NULL scan)
alert tcp any any -> $HOME_NET any (msg:"NMAP NULL scan";flags:0;sid:1000006;rev:1;)

#NMAP (ACK scan)
alert tcp any any -> $HOME_NET any (msg:"NMAP ACK scan";flags:A;sid:1000007;rev:1;)
만약 snort.rules 파일이 vi로 잘 수정되지 않는다면
gedit 명령어를 이용하자
모든 scan의 명령어를 작성해 보았다.
그리고 Nmap 스캔으로 각 스캔을 시도해보자


네가지 스캔 모두 잘 기록되는 것을 볼 수 있다!
스노트 규칙은
alert(Action) icmp(프로토콜) any(출발지 네트워크/호스트) any(출발지port) -> $HOME_NET(목적지 네트워크/호스트) any(목적지port)(옵션)
(Action) (프로토콜) (출발지 네트워크/호스트) (출발지port) -> (목적지 네트워크/호스트) (목적지port) (옵션)
위와 같은 방식으로 이뤄져있다.
Action 유형
> alert : 경고 발생 및 로그 기록
> log : 로그 기록
> pass : 패킷 무시
> drop : 패킷 차단 및 로그 기록
> reject : 패킷 차단 및 로그 기록
옵션 유형
>threshold : type threshold <-- 패킷 발생량 기준 탐지
>threshold : type both <-- IP 주소 기준 탐지
>threshold : type limit <-- 임계 시간 기준 탐지
>track by_src <-- 동일한 출발지 IP 주소 기준 탐지 (1:N)
>track by_dst <-- 동일한 목적지 IP 주소 기준 탐지 (N:1)
>count <-- 패킷 발생 갯수 기준 탐지
이제 ICMP를 탐지하되 10초에 5개의 신호가 오면 기록하게 해보자


위처럼 모든 ICMP를 축약시켜 표시할 수도 있다!!
SYN 플러딩 탐지도 만들어보자


잘 작동하는 것을 볼 수 있다.
하지만 지금과 같은 규칙이면 snort는 SYN scan과 SYN flooding을 구분하지 못한다!
옵션들을 이용해 아래처럼 작성해준다면

#SYN Flooding
alert tcp any any -> 192.168.10.200 any (msg:"SYN Flooding";flags:S;threshold:type threshold,track by_dst, count 1500, seconds 5;sid:1000009;rev:1;)

#NMAP (SYN scan)
alert tcp any any -> 192.168.10.200 any (msg:"NMAP SYN scan";flags:S;threshold:type both, track by_src ,count 50, seconds 5;sid:1000014;rev:1;)


아래처럼 카운트 개수를 올려주면 더 정확해진다.--------------------------------------

#SYN Flooding
alert tcp any any -> 192.168.10.200 any (msg:"SYN Flooding";flags:S;threshold:type threshold,track by_dst, count 3000, seconds 5;sid:1000009;rev:1;)

#NMAP (SYN scan)
alert tcp any any -> 192.168.10.200 any (msg:"NMAP SYN scan";flags:S;threshold:type both, track by_src ,count 1500, seconds 5;sid:1000014;rev:1;)

SYN scan과 flooding을 구분하는 걸 볼 수 있다!
그외에도 Land Attack, ping of death 등의 공격이나
FTP, SSH, TELNET,MySQL등의 접근 로그도 남길 수 있다.


내가 규칙을 설정하기 나름이다!
#FTP

alert tcp any any -> 192.168.10.200 21 (msg:"FTP login";threshold:type both,track by_dst,count 5, seconds 5;sid:1000019;rev:1;)
위 명령어 처럼 특정 포트를 사용하는 서비스를 탐지할 수도 있다.
이상으로 Snort의 사용법에 대해 알아보았다!
'Linux > KALI' 카테고리의 다른 글
| Kali 10. 침투 공격 (1) | 2024.06.12 |
|---|---|
| Kali 9. DoS 공격, netcat, TCPDump (0) | 2024.04.30 |
| Kali 3. 정보 수집 (0) | 2024.04.23 |
| Kali 2. 한글 입력기 설치 (0) | 2024.04.22 |
| Kali 1. Kali Linux 설치 (0) | 2024.03.04 |